
2009 Edition Part 2 Figure 2B-18. Example of Application of Regulatory Signing and Pavement Markings at an Exit Ramp Termination to Deter Wrong-Way Entry
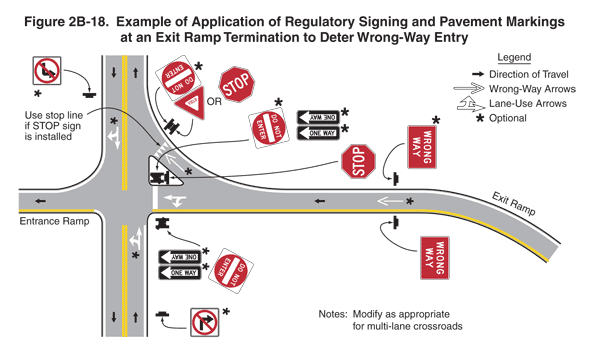
Figure 2B-18. Example of Application of Regulatory Signing and Pavement Markings at an Exit Ramp Termination to Deter Wrong-Way Entry
This figure illustrates an example of applying regulatory signing and pavement markings at an exit ramp termination to deter wrong-way entry.
The figure shows a vertical two-lane roadway. Arrows show that the direction of travel is one lane in each direction. A horizontal exit ramp intersects the roadway from the right, and an entrance ramp is on the left side of the intersection. Arrows show that the direction of travel is right to left on both ramps. A solid double yellow line separates the opposing direction lanes on the vertical roadway. A solid white line is shown on the outside (right) edge of the exit and entrance ramps, and a solid yellow line is shown along the inside (left) edge of the exit and entrance ramps. A solid white line is shown along the outside edges of the roadway in the northbound and southbound directions.
A legend shows a black arrow indicating the direction of travel in the lanes, an outline arrow to show a wrong-way arrow, a white arrow to show a lane-use arrow, and an asterisk to show optional use. A note states to "modify as appropriate for multi-lane crossroads."
At the bottom of the figure on the vertical roadway, a No Right Turn symbol sign is shown to the right of the roadway and marked with an asterisk. This sign is shown in advance of a white combined left-turn and through arrow marked on the pavement and with an asterisk. Opposite this arrow and at the intersection, a Do Not Enter sign is shown angled to face southbound traffic on the vertical roadway. It is shown mounted in front of back-of-back ONE WAY signs that face both directions of traffic on the vertical roadway. All three signs are marked with an asterisk. On the far side of the intersection on the vertical highway, a No Right Turn symbol sign marked with an asterisk is shown to the right of the roadway in advance of a white combined right-turn and through arrow shown marked on the pavement and with an asterisk.
To the right, on the horizontal exit ramp, red Wrong-Way signs are shown on both sides of the roadway, facing west. The sign on the north side of the ramp is marked with an asterisk. A white wrong-way arrow pointing to the left is shown on the pavement between them and marked with an asterisk. As the exit ramp approaches the intersection, it splits into two lanes, one for right turns, and one for through and left turns, separated by a triangular-shaped channelizing island.At the intersection of the exit ramp right-turn lane and the vertical roadway,another white wrong-way arrow marked with an asterisk is shown marked on the right-turn lane. It is shown in advance of a white yield line on the pavement with a note to "Use stop line if STOP sign is installed." Just beyond that arrow on the right side of the ramp adjacent to the right-turn lane, a YIELD sign to the left of the word "OR" and a STOP sign are shown mounted back-to-back with a Do Not Enter sign, which is marked with an asterisk. In the exit ramp's through and left-turn lane, a combined left-turn and through arrow is shown marked on the pavement at the intersection in advance of a white stop line at the intersection. On the triangular-shaped island, a STOP sign is shown facing east, mounted in front of back-to-back ONE WAY signs marked with an asterisk that face both directions of the vertical roadway and are mounted with a Do Not Enter sign marked with an asterisk angled to face traffic traveling south on the vertical roadway.