
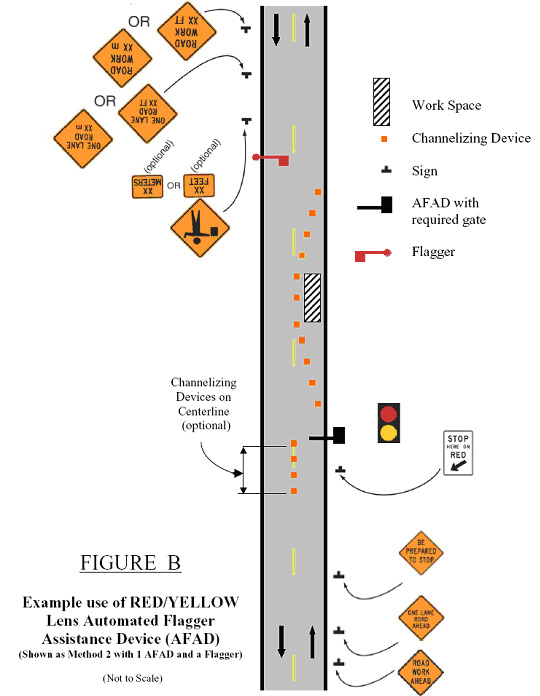
Figure B. Example Use of RED/YELLOW Lens Automated Flagger Assistance Device (AFAD)
(Shown as Method 2 with 1 AFAD and a Flagger)
This figure illustrates the placement of a RED/YELLOW Lens AFAD, channelizing devices, signs, and a flagger to guide traffic around a work zone.
A two-lane, two-way road is shown with a work space and temporary traffic control zone occupying one lane. Channelizing devices have been arranged to guide traffic around the zone via the opposite lane.
At the side of the obstructed lane, three advance warning signs are placed sequentially on the shoulder of the roadway: "ROAD WORK AHEAD" (W20-1); "ONE LANE ROAD AHEAD" (W20-4); and "BE PREPARED TO STOP" (W3-4). After the signs, several channelizing devices marked "optional" are placed along the centerline of the roadway. A "STOP HERE ON RED" (R10-6 or R10-6a) sign is placed on the shoulder of the roadway just before the AFAD. The AFAD is adjacent to the centerline channelizing devices, and its gate arm extends to the center of the roadway. The AFAD alternatively displays a steadily illuminated red lens and a flashing yellow lens.
On the opposite (unobstructed) lane approaching the construction zone, three advance warning signs are placed sequentially on the shoulder of the roadway: "ROAD WORK XX FEET" or "ROAD WORK XX m" (G20-1); "ONE LANE ROAD XX FEET" or "ONE LANE ROAD XX m" (W20-4) ; and a Flagger sign (W20-7a) with optional "XX FEET" or "XX METERS" (W16-2) sign. The Flagger is stationed after the three signs and before the work zone. There are no channelizing devices in the unobstructed lane.