
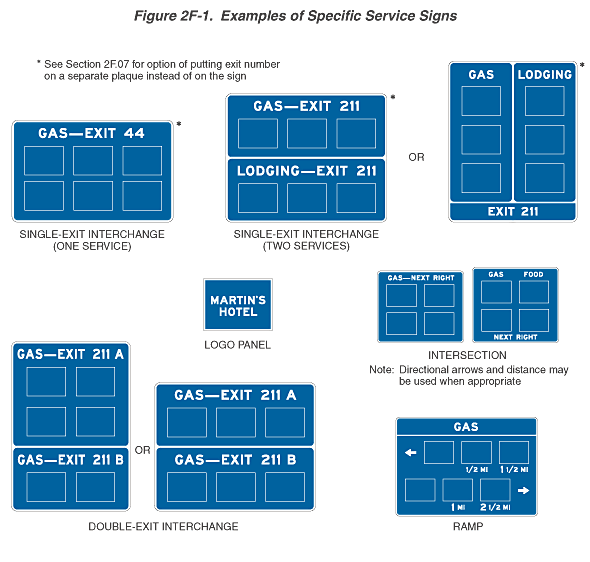
Figure 2F-1. Examples of Specific Service Signs
This figure shows eight examples of specific service signs. They are rectangular blue signs with white borders and lettering.
An asterisk is to the left of the note "See Section 2F.07 for option of putting exit number on a separate plaque instead of on the sign."
The first illustration is labeled "SINGLE-EXIT INTERCHANGE (ONE SERVICE)." It is shown as a horizontal rectangular sign with the words "GAS – EXIT 44" above six blank horizontal rectangular panels arranged in two horizontal rows of three panels each. An asterisk is shown to the right of this sign.
The second illustration is labeled "SINGLE-EXIT INTERCHANGE (TWO SERVICES)." It is shown as a horizontal rectangular sign divided horizontally by a white line. On the top half, the words "GAS – EXIT 211" are shown above three blank horizontal rectangular panels in one horizontal row. On the bottom half, the words "LODGING – EXIT 211" are shown above three blank horizontal rectangular panels in one horizontal row. An asterisk is shown to the right of this sign. To the right of this sign, the word "OR" is shown and another sign. This is shown as a vertical rectangular sign divided vertically by a white line. On the left half, the word "GAS" is shown above three blank horizontal rectangular panels in one vertical row. On the right half, the word "LODGING" is shown above three blank horizontal rectangular panels in one vertical row. Below both vertical panels, a horizontal rectangular panel is shown the width of the sign with the words "EXIT 211." An asterisk is shown to the right of this sign.
The third illustration is labeled "LOGO PANEL" and is shown as a horizontal rectangular panel with the words "MARTIN'S HOTEL" on two lines.
The fourth illustration shows two horizontal rectangular signs, both labeled "INTERSECTION." The sign on the left shows the words "GAS – NEXT RIGHT" above four blank horizontal rectangular panels arranged in two rows of two panels each. The sign on the right shows the word "GAS" above two blank horizontal rectangular panels in one vertical row to the left of the word "FOOD" above two blank horizontal rectangular panels in one vertical row. The words "NEXT RIGHT" are shown centered at the bottom of the sign under the panels. To the right of these two signs, a note states "Directional arrows and distance may be used when appropriate."
The fifth illustration is labeled "DOUBLE-EXIT INTERCHANGE." It is shown as a vertical rectangular sign divided horizontally by a white line. On the top half, the words "GAS – EXIT 211 A" are shown above four blank horizontal rectangular panels in two horizontal rows of two panels each. On the bottom half, the words "GAS – EXIT 211 B" are shown above two blank horizontal rectangular panels arranged in one horizontal row. To the right of this sign, the word "OR" is shown and another sign. This is shown as a horizontal rectangular sign divided horizontally by a white line. On the top half, the words "GAS – EXIT 211 A" are shown above three blank horizontal rectangular panels in one horizontal row. On the bottom half, the words "GAS – EXIT 211 B" are shown above three blank horizontal rectangular panels in one horizontal row.
The sixth illustration is labeled "RAMP." It is shown as a horizontal rectangular sign divided horizontally by a white line. Above the line, the word "GAS" is shown. Below the line, two horizontal rows of blank panels are shown. In the top row of panels, a short left-pointing arrow is shown to the left of three blank horizontal rectangular panels. Under the second and third panels, the words "1/2 MI" and "1 ½ MI" respectively are shown. In the bottom row of panels, three blank horizontal rectangular panels are shown to the left of a short right-pointing arrow. Under the second and third panels, the words "1 MI" and "2 ½ MI" respectively are shown.